2023-06-18
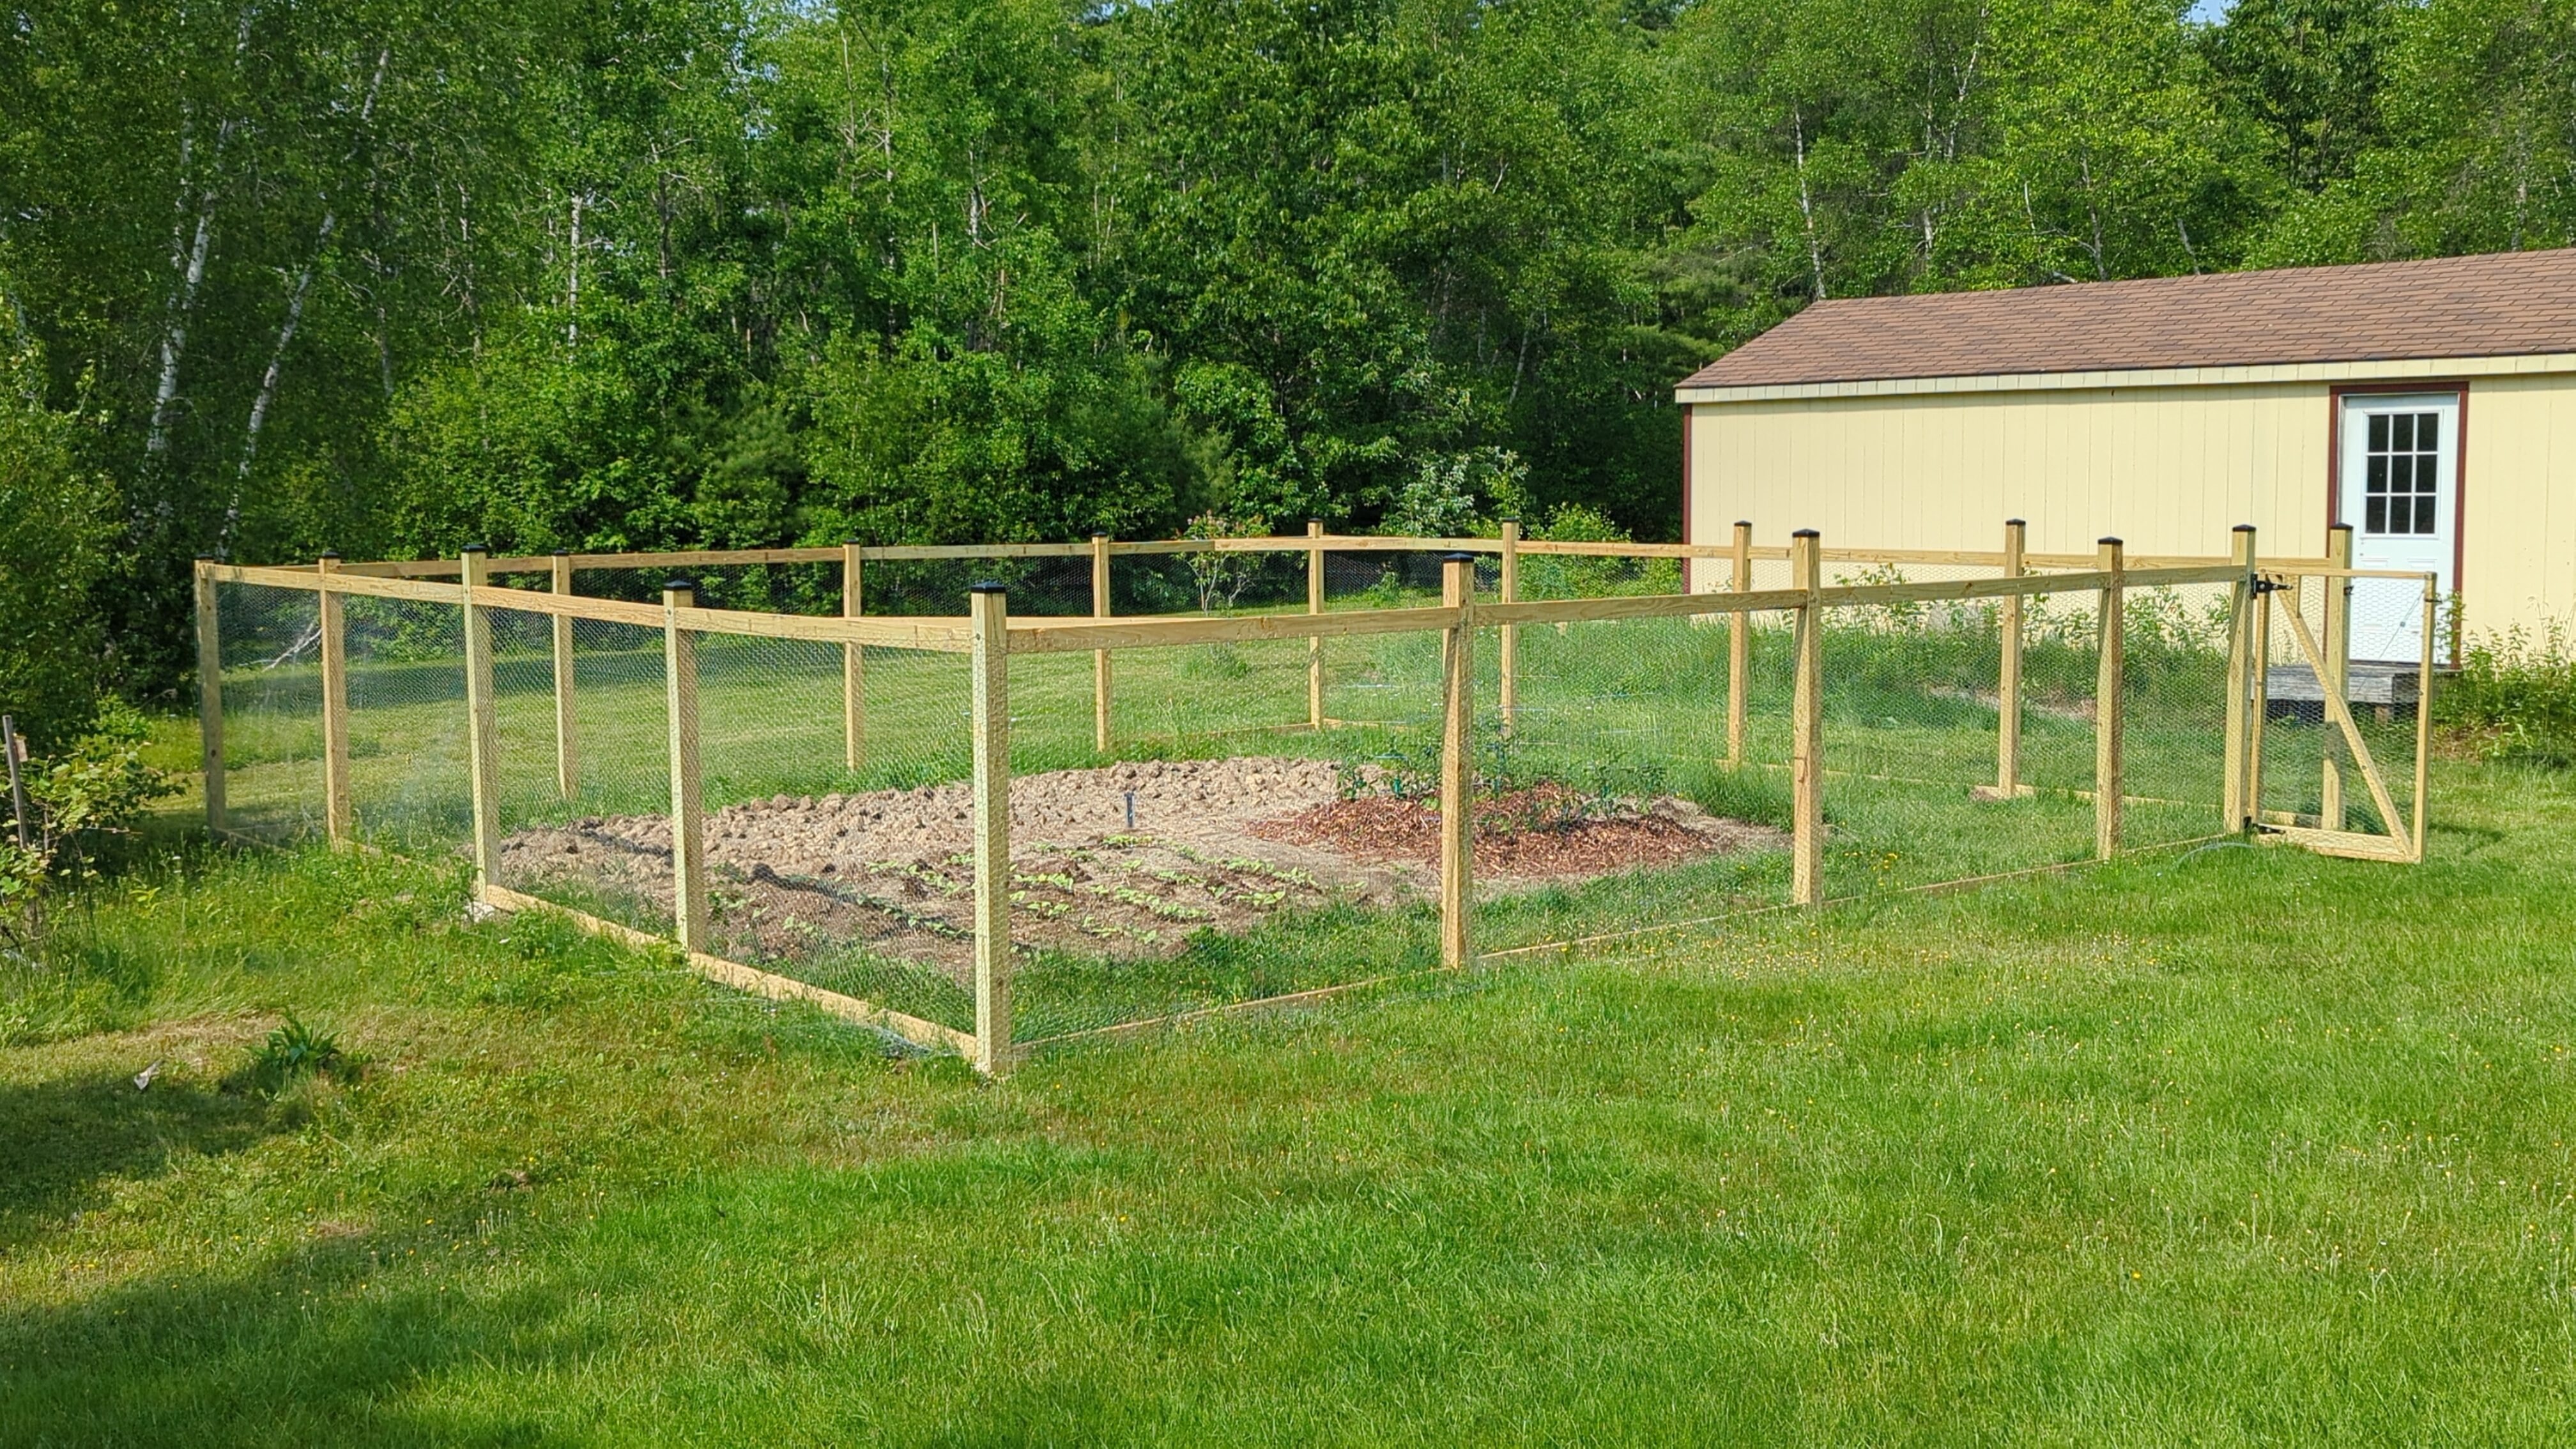
TL;DR: I built the fence that I designed in part one. This project took a lot of physical effort, which somehow surprised me. I’m happy with the result and feel pride in my work. My family and a good friend provided me with physical help and useful advice. Their contributions were critical for the success of this project. All of them are in this fence somewhere, and because of our collective effort, I get to enjoy it for many years. And, of course, the creatures who nibbled on my vegetables last year will have a much harder challenge from now on.
The term “snap line” seems to refer mostly to a woodworking tool that helps make straight cuts between two points. The user stretches a length of string between two points along a piece of lumber and “snaps” it by pulling it away from the wood somewhere in the middle and releasing it. The string, which has been covered in some kind of chalk, leaves a line along the path between the two points. This line then serves as a guide during a cut. I guess this is probably better in some cases than a straight edge and a pencil.
Another use of the term seems to be what I built when I began the construction portion of this project. Instead of stretching chalked string over a piece of wood, fence makers seem to often stretch string between stakes driven into the ground. These strings provide straight lines along which the builders can dig holes and set posts.

The first step I took was to place several stakes near the presumptive corners of the fence. My original design was for a square fence with side length 32’, but this turned out to be a bit too big for the garden area, so I reduced the side length to 30’. Since the posts are all equally spaced (except the hinge post for the gate), the side length doesn’t matter as long as it can be spanned by the number of 8’ rails that I had specified per side (that is, four). I can trim the rails by an arbitrary amount within a certain range.
Aligning the snap lines with each other and the existing garden plot took more time than I imagined. Due to some inconveniently-positioned shrubs and rocks, I decided to offset the fence from the garden plot, leaving more “margin area” on two sides. I found it helpful to set up four more stakes on the corners of the garden plot itself. These additional stakes provided a datum against which I could position the snap line stakes. Once I had the stakes in more or less the right position, I spent a lot of time aligning them. For each side, I walked along an extension of the snap line and used parallax to estimate the alignment of the stakes. This took several passes and a lot of adjustment, but eventually I converged on a decent solution. I verified that the snap lines were close enough to square by measuring each side length and the diagonals. All values were within a few inches of their targets, so I declared success.
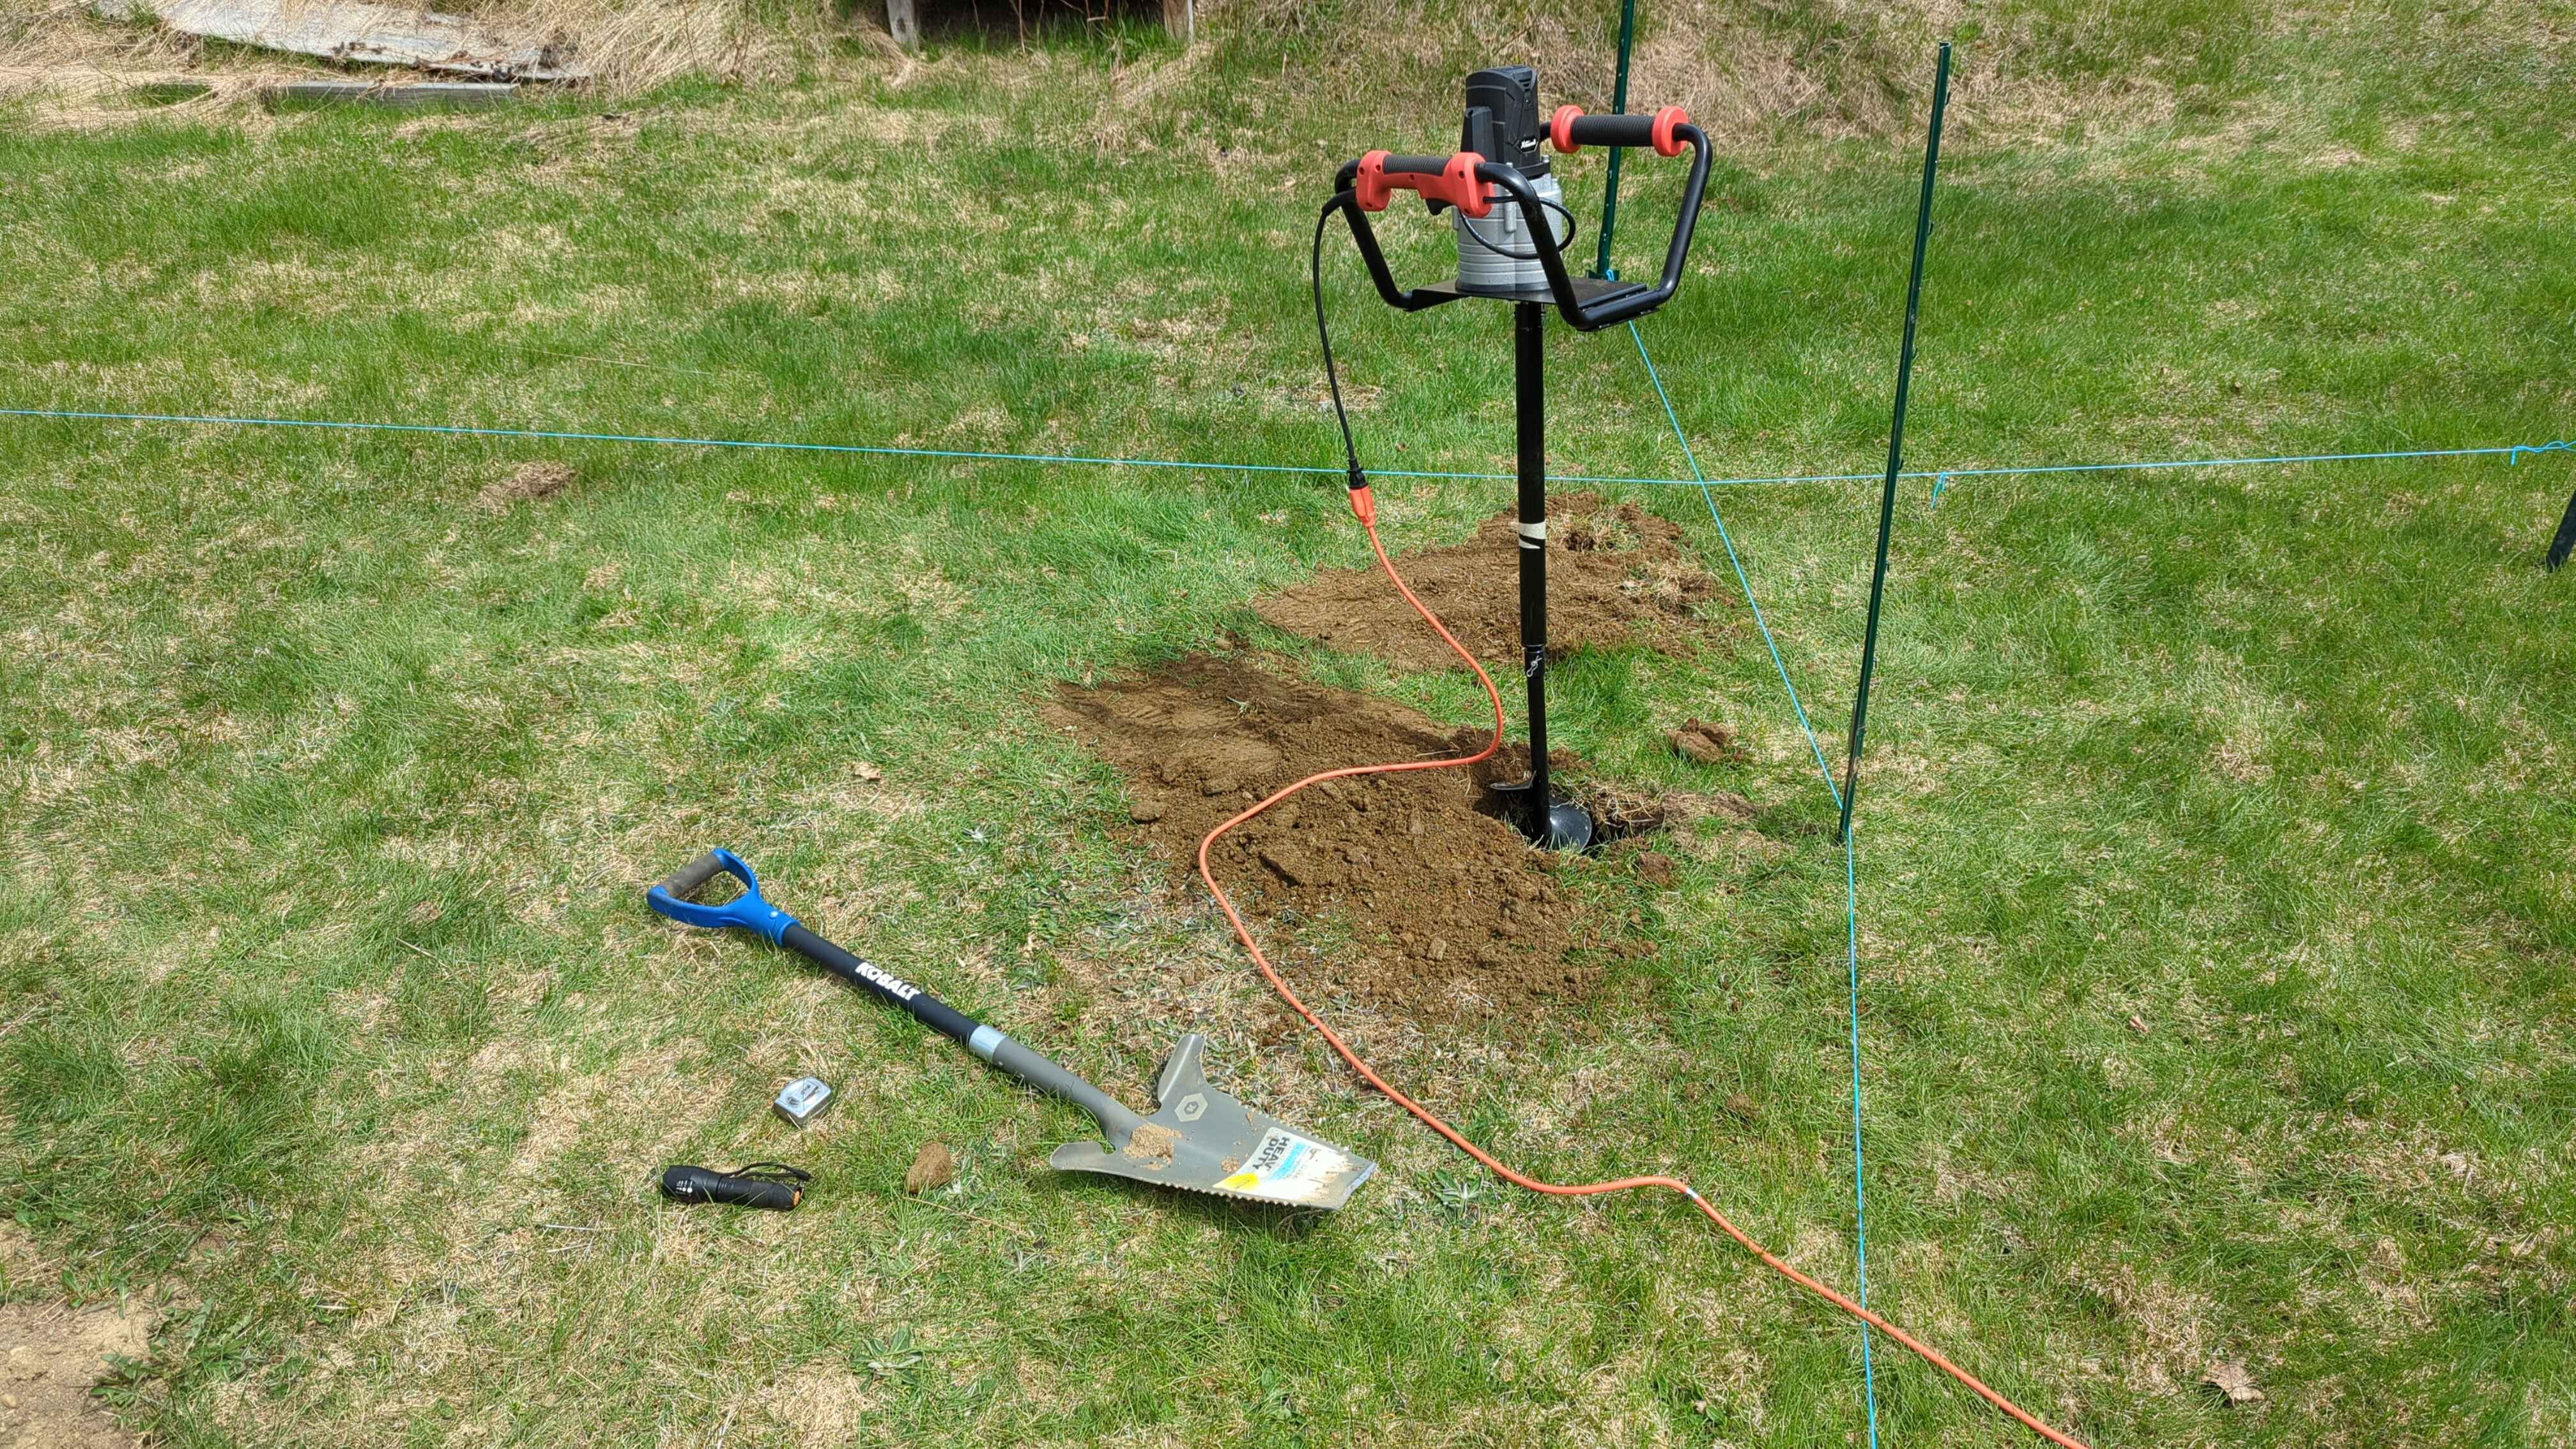
Digging holes is hard work. I had some idea that this was the case before working on this project, but now I’m a little closer to understanding the dull suffering that is removing a cylinder of dirt from the ground. I bought a machine to help me, and I think this decision accidentally saved the project. Without some mechanical help, I think I’d still be out there removing rocks and roots by hand. The soil in my area seems to be filled with stones of all sizes, and there’s also a layer of rock about 18 inches below the surface that I couldn’t penetrate. The machine, which is nothing more than an electric motor with a corkscrew attachment called an auger, helped get the holes started but would often get jammed in the rocks. This would force me to stop, pull the machine out, clear the obstruction as much as possible, and then continue digging. Pulling the machine out of the ground after it’s been running for a bit is often difficult, and struggling at this stage accounted for most of my frustration, pain, and sweat.
I originally planned to dig down to 36 inches, 6 of which I’d fill with gravel, leaving 30 for the post. This would have roughly followed the rule of thumb that one third of a post’s length should be below ground. It became clear to me after a lot of effort that it wasn’t going to be possible to achieve that depth due to the rock layer. Instead, I settled for wider and shallower holes. I aimed to make each hole the same volume as it would have been had it gone to full depth, which I thought might marginally increase the strength of the post in opposition to its shallower base. This meant measuring the rough dimensions of the holes after I’d gone down as far as I could (about 15–18 inches) and modelling the widened holes as truncated cones. This actually worked out decently well, at least in terms of getting the right volume. The strength of these shallower posts remains to be seen, although for the moment they seem sturdy.
I felt a lot of stress during this period of the project because there were still a lot of unknowns and things that could go wrong, and one of the parts that I thought would be easy (digging the post holes) turned out to be difficult.
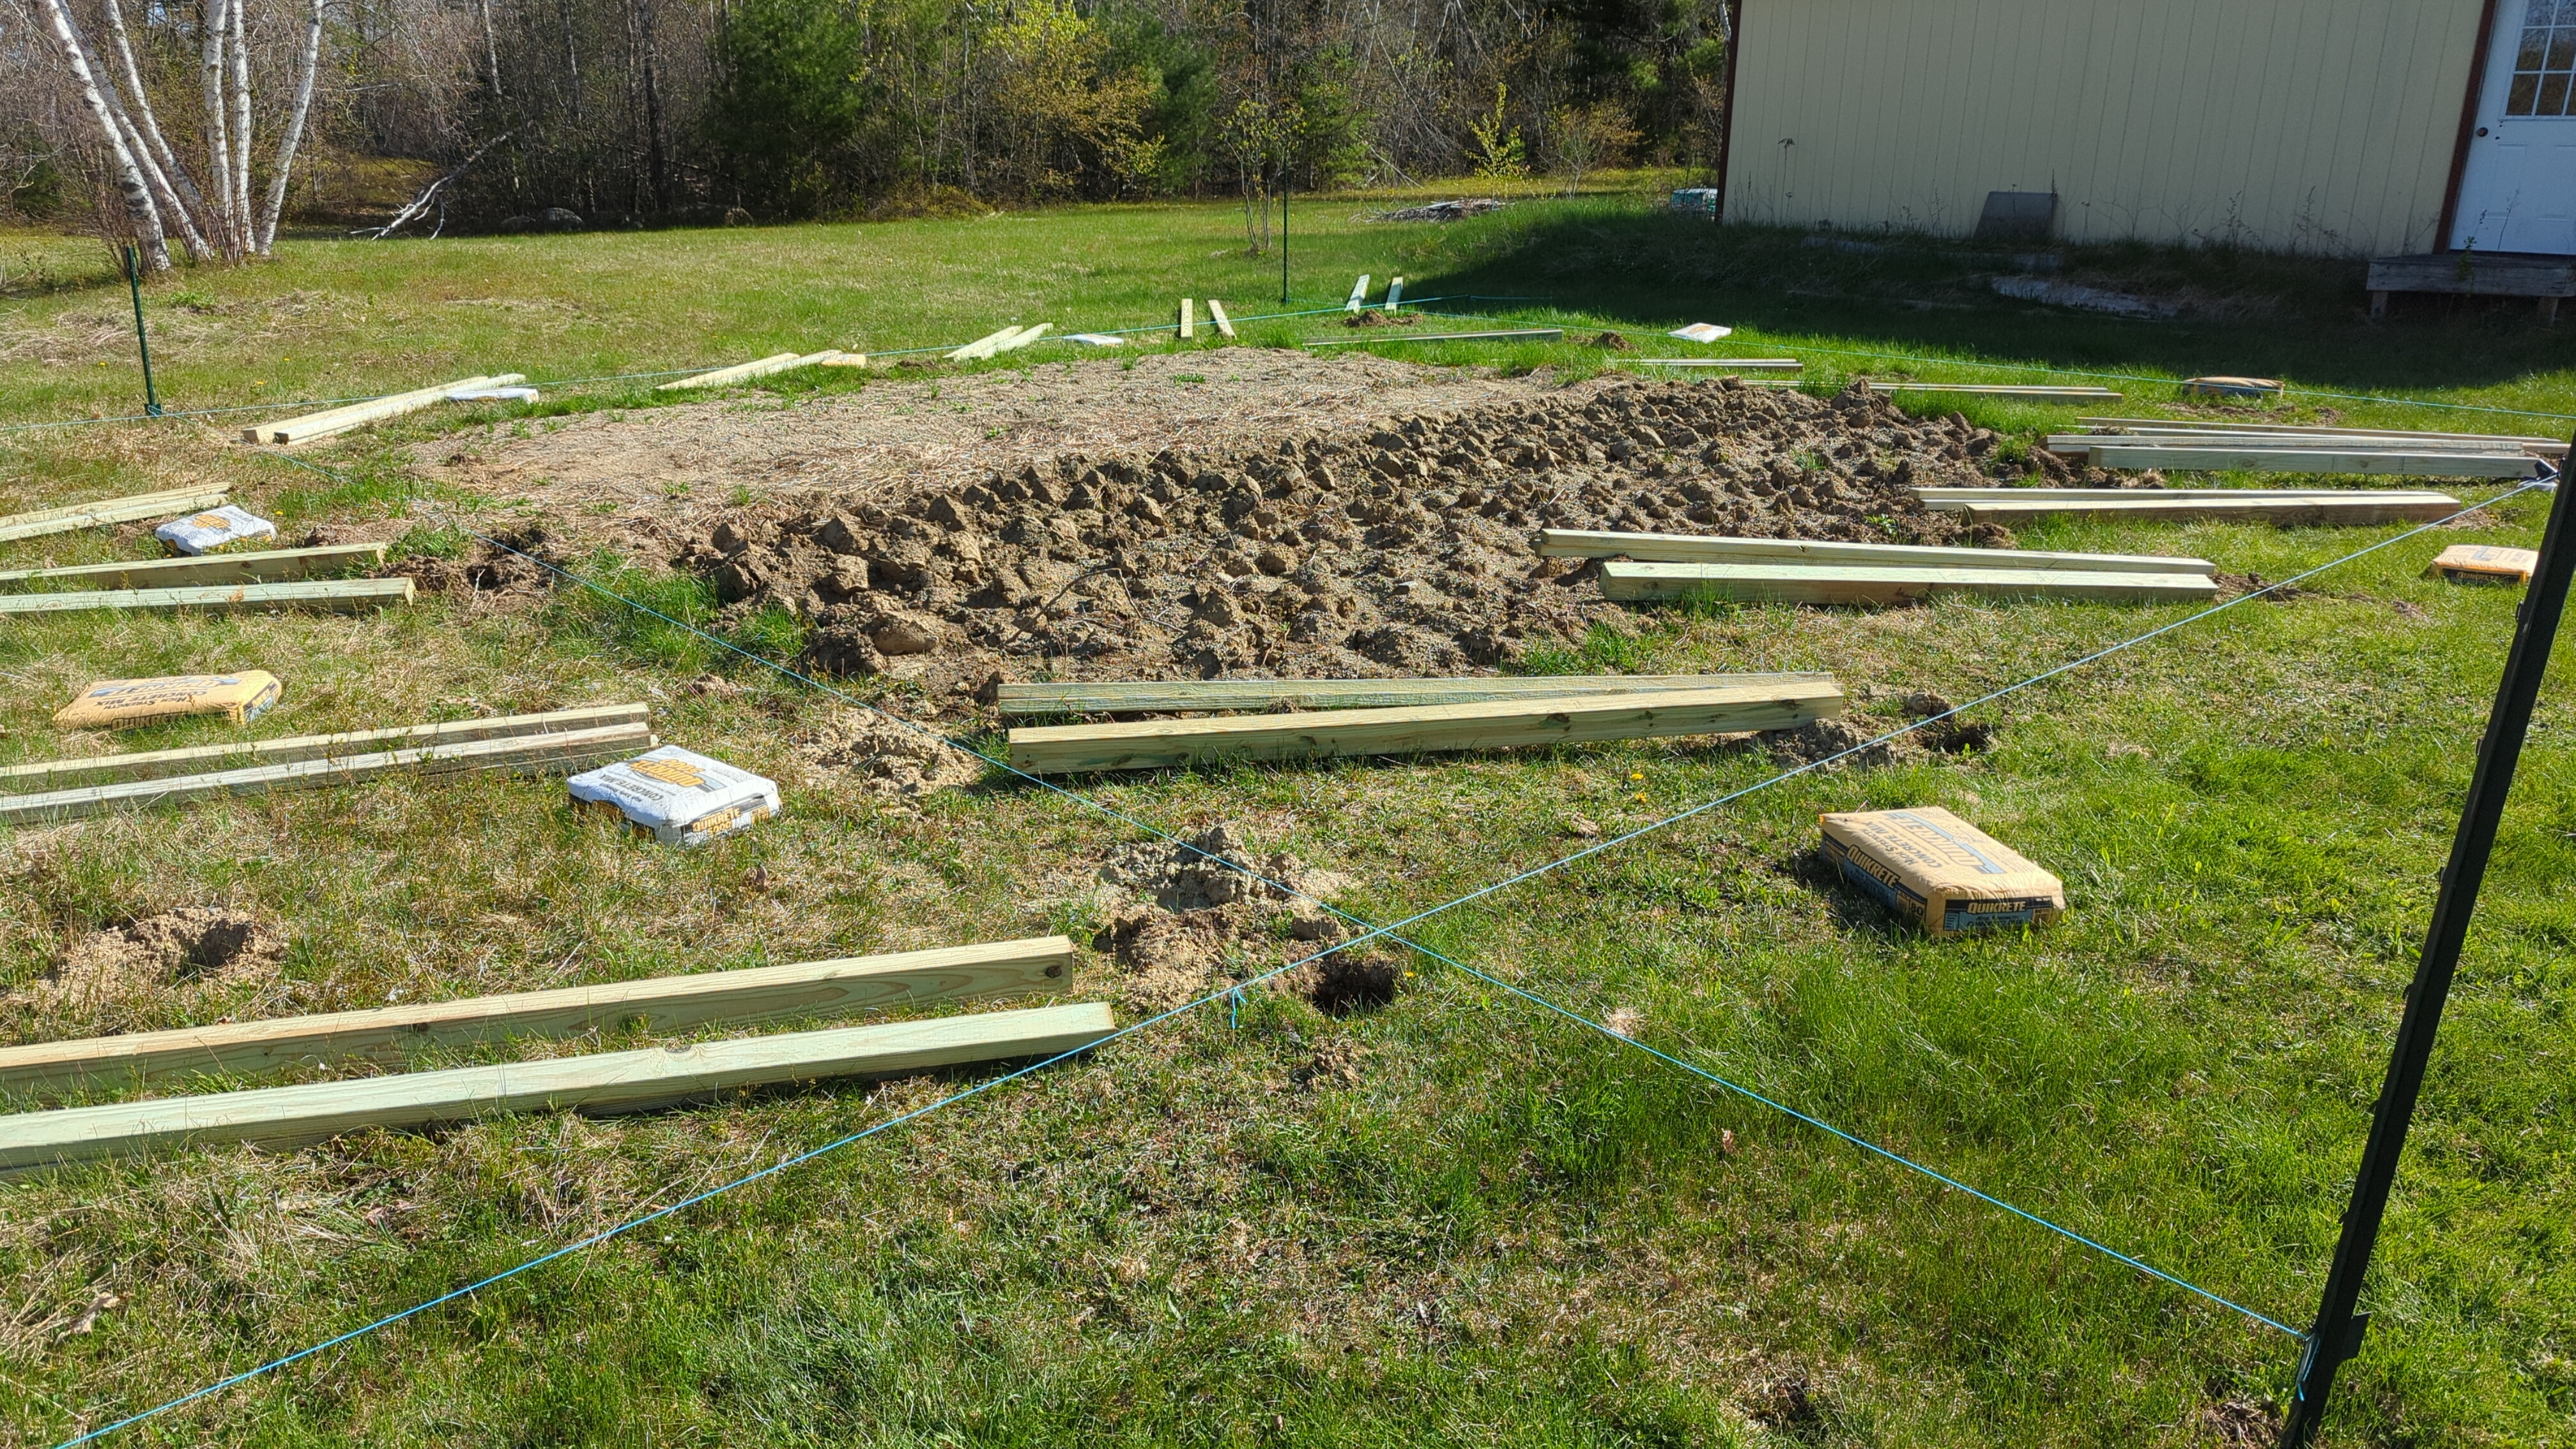
I needed about one ton of materials for this project, most of which was the lumber and concrete mix. I bought the lumber at my local Home Depot and borrowed my grandfather’s pickup truck to haul it home. The lumber was all pressure treated and rated for ground contact, so it should remain intact for many years outside. Later, I bought a dozen 80-lb bags of concrete mix from a local hardware store and brought them home in two trips in my car. The lumber was easy enough to move, but the bags of concrete mix were quite difficult for me. I’m not that strong, so I ended up sore and tired after moving all the bags into position next to their holes. I think the main problem I had was that the bags are smooth and rounded on the outside, so there’s nothing easy to grab when picking them up.
When calculating how much material to buy, I added a waste factor of 15%. I wasn’t sure how many errors I would make during construction, so I thought it would be smart to get a little extra of certain stuff. It turned out that I didn’t use the extra material, but I was glad to have it anyway because it reduced my stress as the project went along. It was worth a little extra money to me to know that I wasn’t going to run out of material right at the end. I was especially concerned about the concrete mix, since there’s a time component to its use, but it wasn’t a problem. I stored the extra materials for future projects.
I ordered the rest of the materials online or picked them up at my local hardware store. The notable items from this group were the large roll of chicken wire and the metal post caps.
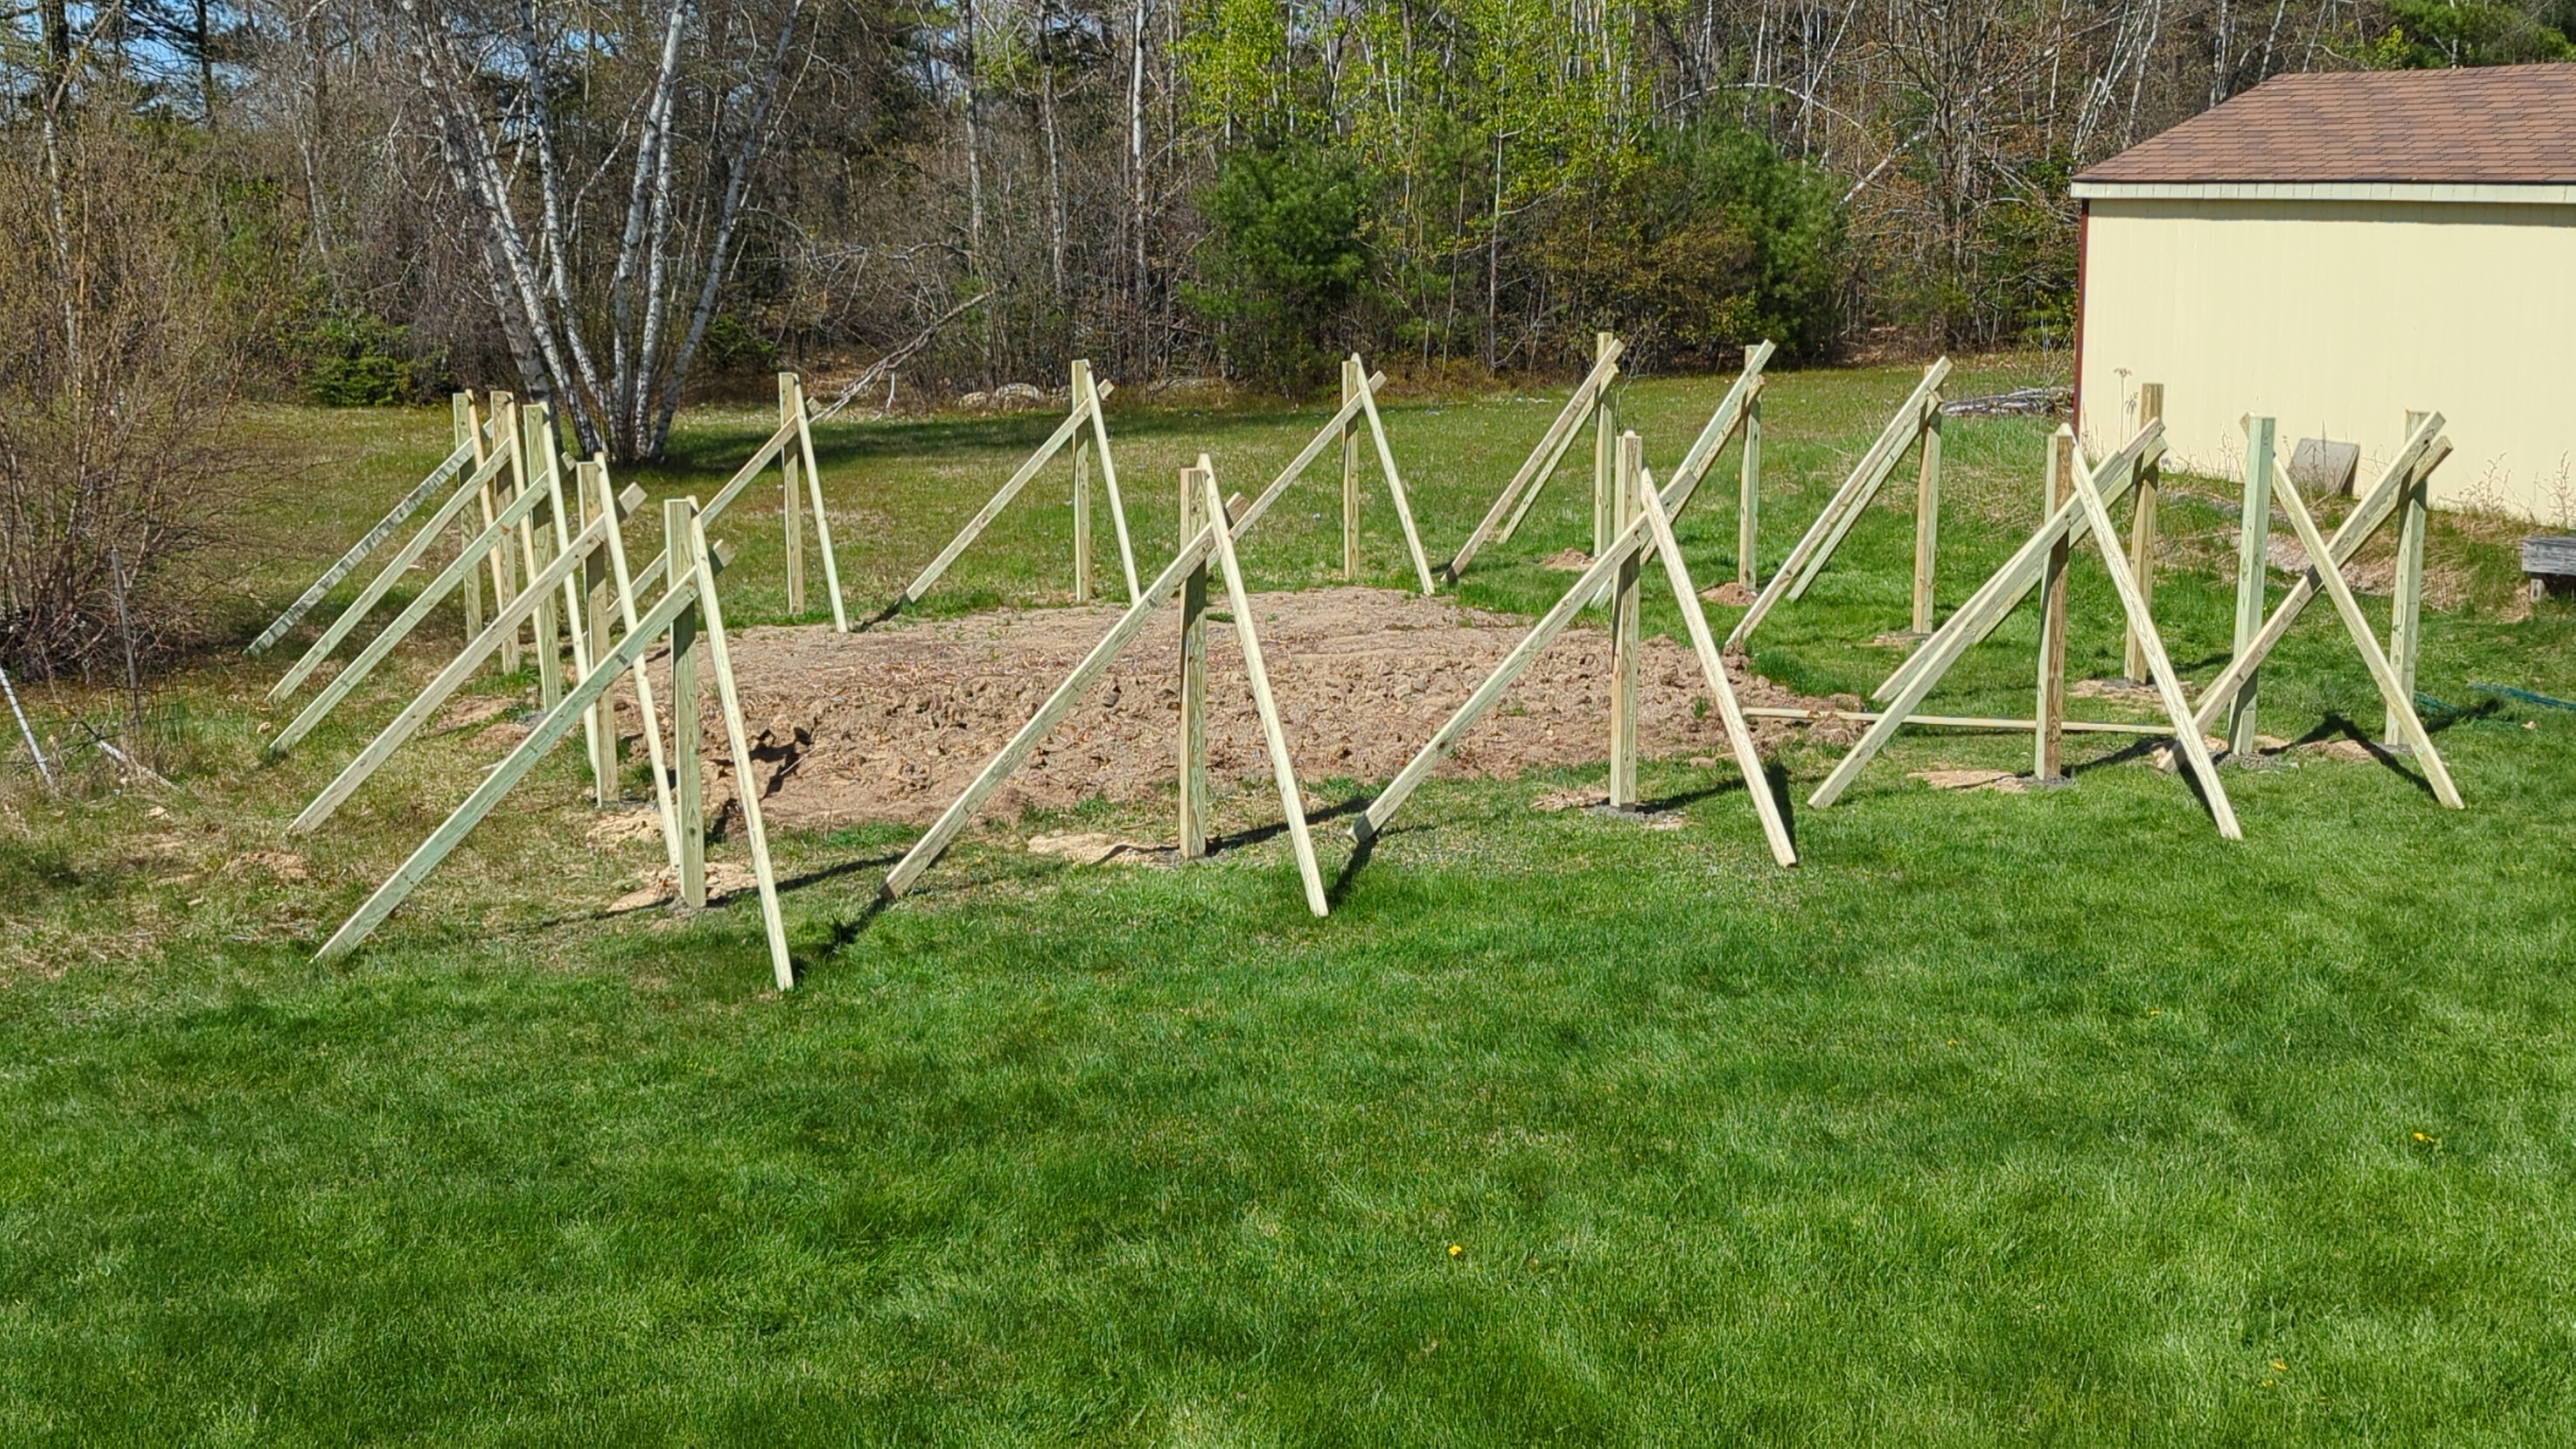
Some helpful members of my family came over to help me set all 17 posts in concrete. We were able to set all the posts in about four hours, partly because of the prep work I’d done in the previous days. Having all the materials ready to use and in position saved us a lot of time. We followed the same steps for each post:
Mixing the concrete wasn’t easy. I bought a small tub that could hold about one bag’s worth of mix. We used the garden hose to apply water to the dry mix and then combined the mixture with hand tools. The dry mix seems to be slightly hydrophobic, so thorough mixing is important. The mix is also quite dense, so moving it around takes some force.
For the hinge post, we added extra concrete by making a larger mound than the other posts. This seemed like a good idea because the hinge post has to support the weight and moment of the gate. It’s unclear to me how much of an effect this had, but it was convenient because we happened to have a little extra wet mix in the tub at the time.
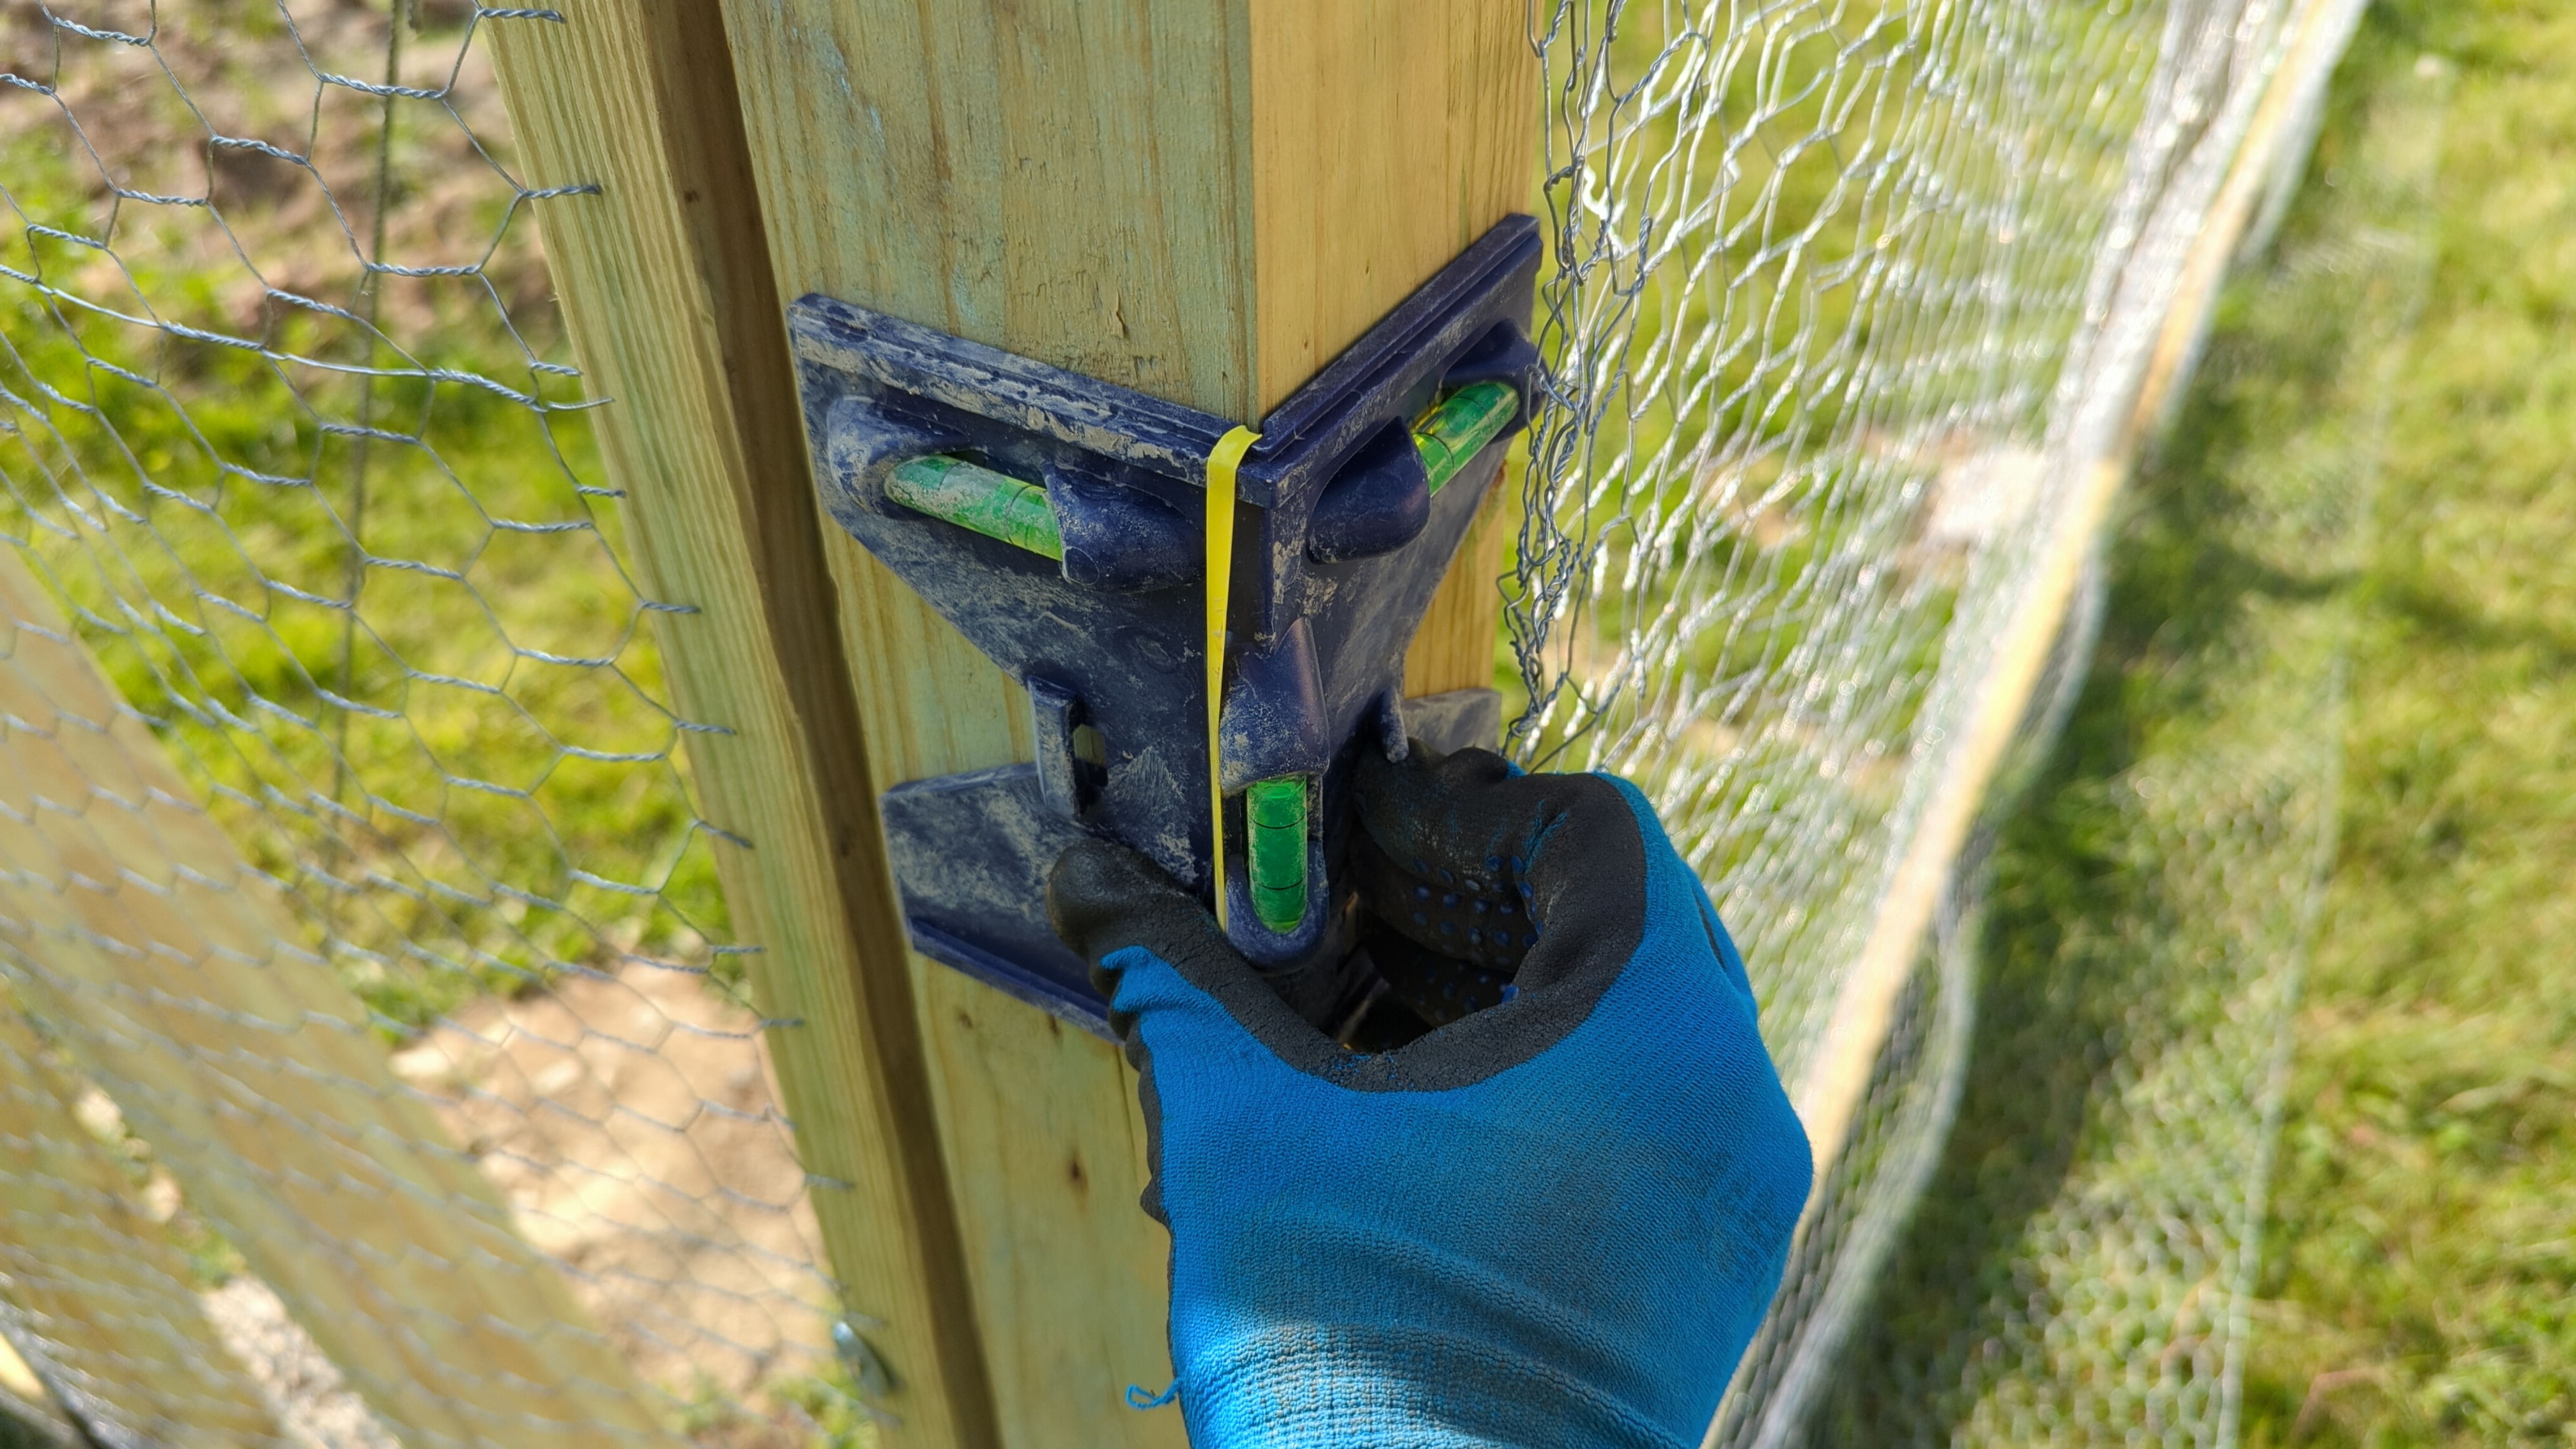
The snap lines and bidirectional level helped us to get everything aligned within acceptable tolerances. The alignment isn’t perfect, but the errors are only noticeable if you’re looking for them. The “roll” axis on each post wasn’t well-constrained by these tools, so one or two posts are probably more than a few degrees “out of twist”. This didn’t end up mattering much, but if I had to do it again I’d probably try to track that more closely.

I was in high spirits at this point because it looked like the remaining tasks in the project were relatively uncomplicated. This turned out to mostly be true. There was still a lot of work to be done, but none of it was particularly unknown to me, and it didn’t depend on anything time-sensitive. Having the posts set according to my design relieved me of a lot of stress. It felt like this might actually work.
One sunny Saturday, my good friend Logan Boyd left his cushy downtown apartment and joined me up in farm country for a long day of collaborative carpentry. We cut the rails to length and installed them, starting with the bottom (which hugs the ground) and ending with the top (which is all at the same level). As the sun was setting, we cut and installed the three corner braces, which seemed to increase the strength of the corner posts.
Logan and I came up with a few optimizations that made the work go faster.1 Most of them aren’t worth mentioning or trying to explain because they relied on the particular constraints of our situation. For example, I only had one extension cord, so we could only run the corded drill or the skilsaw, but not both at the same time. We took some extra time to think about how to make sure the top rails would end up at the same level all the way around the perimeter, which isn’t trivial because the ground changes in elevation. In the end we figured it out, and the result is nice and level. One or two posts did come up short, so we decided to cut a few square blocks from scrap wood and screw them on top to lengthen the short posts. Fortunately, these short posts are on the far side of the fence where they aren’t as visible.
We decided early in the day to abandon my “corner block” fastening method and drive the rail screws in diagonally instead. This wasn’t exactly easy but was probably a lot easier than dealing with lots of small blocks. The result looks fine and is mostly invisible anyway. The difficulty came mostly from starting the screws at an angle and getting the angle correct. We found that starting the screws on lighter parts of the wood seemed to encourage faster starting. Maybe these parts of the wood are softer. Sometimes the angle would be wrong enough that the screw would poke out of the back of the rail before entering the post. Our solutions were to either back it out and try again or say “that’s why we use two screws.”
A day or two later, I nailed on some post caps. These are nothing more than weather-tolerant metal pyramids that discourage water from collecting on the flat upper faces of the posts. While all the wood in this project is treated for ground contact, it’s still a good idea to protect the wood where possible so it’ll last even longer. They also look nice.
The advantage of chicken wire seems to be that it’s a reasonably inexpensive way to durably cover a fence panel and completely block practically all animals. The problem I have with it is that it’s hard to work with, especially alone. The chicken wire comes in a roll, which means that its metal wires are bent and won’t lay flat against the fence panel without some coaxing. The roll is heavy at first and awkward to move around. I found that once I managed to secure one corner of the chicken wire to a post with a screw and a large washer, things got a little easier. I unrolled the material around the next corner, pulled it as tight as I could, and drove several more screws and washers into the posts. When rounding a corner, I had to cut part of the chicken wire on the bottom so the “skirt” portion could make the turn.
At this point in the project I was tired and frustrated. I had been working on the fence most evenings for over a week and felt like I wasn’t getting much closer to done. I wanted to stop thinking about this and move on to actual gardening. The fence still needed a gate, though, so I got working on that.
Assembling the gate started out kind of fun and was a refreshing change. The frame is nothing more than four bits of wood screwed together, but I knew it would be important to get the dimensions correct so the gate would fit well in the space I’d left for it. Soon I had a frame that was just the right size, and it was time to install the anti-sag mechanism. Over time, an unsupported gate is likely to sag, which means that the outer edge (opposite the hinge post) will fall down, causing the frame to bend and no longer fit properly. A solution to this problem is to attach a metal cable between the upper corner on the hinge side and the lower corner on the latch side. Using a turnbuckle mechanism, it’s possible to apply tension in the cable that counteracts the sagging. I installed the anti-sag hardware, which came in a kit, and moved on.
This is where I started to get frustrated. The sun was going down, and I still felt like I had a lot left to do. I cut and installed a diagonal member on the gate that would support it in the other direction and provide a place for the hinges to grab on. I installed the hinges, which also came in a kit, but I ran into an annoying problem. The screws in the hinge kit seem to have been made from a softer kind of metal, so my drill bit quickly stripped the screws and made it difficult to turn them. I wasn’t able to drive them all the way in, so I was forced to turn them out by hand with some pliers. It was starting to get hard to see at this point. Later on I realized that I probably should have taken the extra time to drill pilot holes, which would have reduced the torque on the screws while driving them in. I ended up discarding the kit screws and using thinner wood screws with large washers. I also managed to cut and install a rectangular section of chicken wire on the gate.

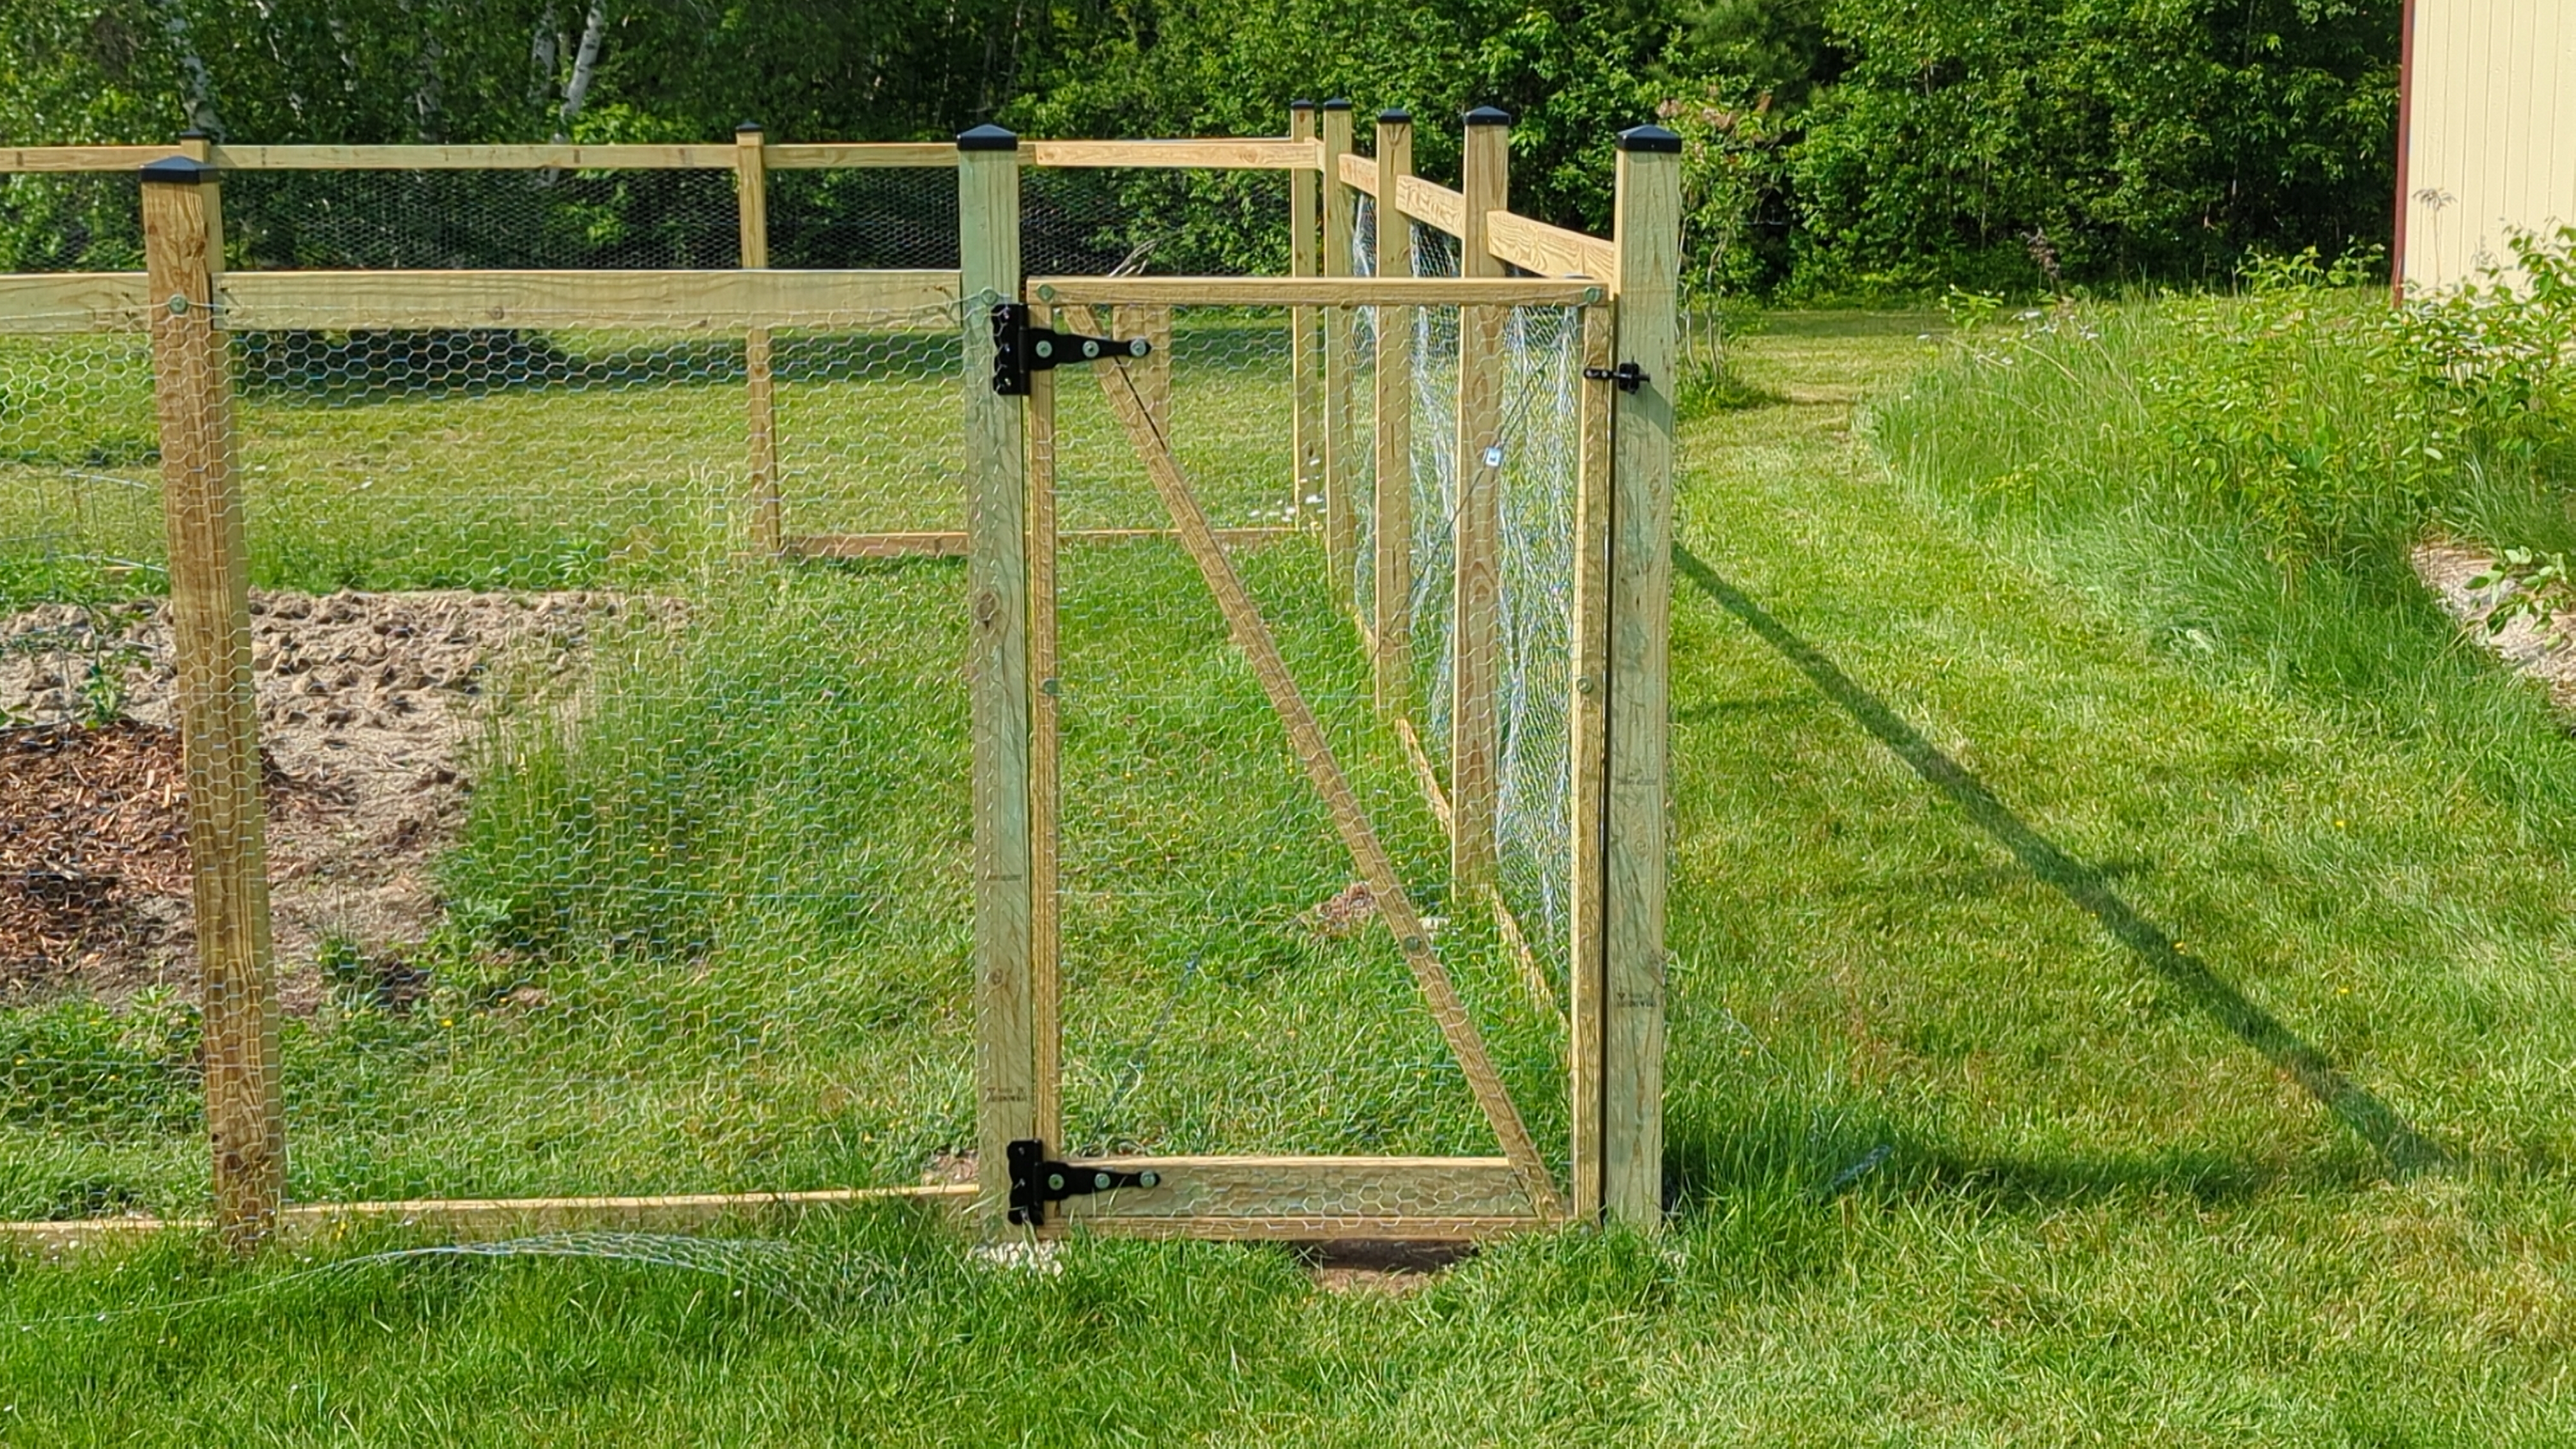
I ran out of time on the first night, and I felt defeated. Fortunately, the next day all I really had to do was hang the gate, and that didn’t take too long.2 I installed the latch, and suddenly I had a complete gate and a complete fence (!). I found this surprising and delightful — so much that I brought a chair into the garden and sat quietly to admire my work and enjoy the breeze.
I realized while sitting peacefully that I installed the gate backwards. It does its job, of course, but the anti-sag mechanism is running between the wrong corners. It might be marginally increasing the gate’s stiffness, but it’s not really protecting the gate from sagging, as far as I can tell. I must have made this parity error in my frustrated haste the night before. An annoying error, but not that critical.
